# kvs KVS: Kernel Version Switcher (anti-rollback rollbacker) <br> [](https://github.com/kxtzownsu/KVS-private/actions/workflows/kvs.yaml) [](https://github.com/kxtzownsu/KVS-private/actions/workflows/kvg.yaml) <sub> my first real C project, the code may look like shit, dont get mad at me because of it! :3 </sub> ## Build Instructions 1) Clone the repo: <br /> ``` git clone https://github.com/kxtzownsu/KVS.git cd KVS/builder/ ``` 2) Make sure you have the following dependicies installed: <br /> ``` gdisk e2fsprogs ``` 3) Run the builder: <br /> ``` sudo bash builder.sh <path to RAW shim> <optional flags> ``` ## Booting a KVS shim After installing KVS to a raw shim, download & open the [Chrome Recovery Utility](https://chromewebstore.google.com/detail/chromebook-recovery-utili/pocpnlppkickgojjlmhdmidojbmbodfm?pli=1). <br /> 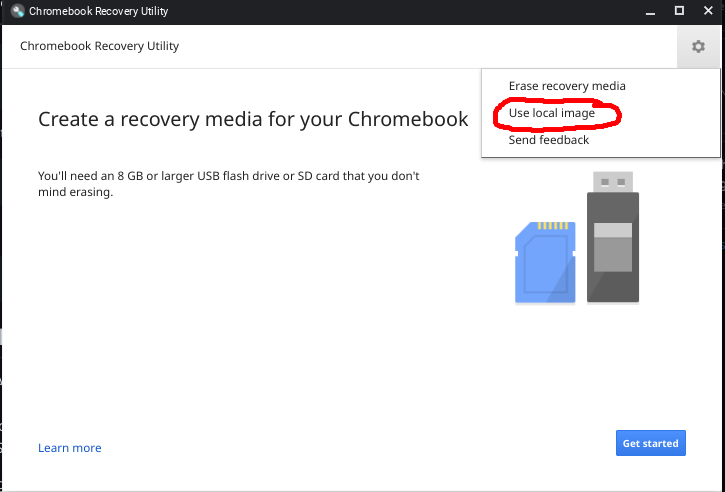 <br /> Press the Settings (⚙️) icon in the top right, and press "Use Local Image". Select your built KVS shim, and then select your target USB / SD. After flashing the USB/SD, insert the newly-flashed USB/SD into your target device. Once inserted, press ESC + REFRESH (↻) + PWR (⏻) and then press CTRL+D and then enter. Once in Developer Mode, your screen should look similar to this:  Now, press ESC + REFRESH (↻) + PWR (⏻) again and it should load into KVS. ## DISCLAIMER I am unable to provide any raw shim files directly. Raw shims are Google's property signed with their private keys. <br /> Any legal trouble you recieve due to possessing a raw shim for KVS is not my responsibility. ## Credits kxtzownsu - writing KVS & KVG, porting to C <br /> hannah - writing the `is_ti50` tool, moral support, testing <br />